Set up TV Sound in just a few steps
Download the Quick Start Guide
- TV Sound - Get started Uploaded | PDF | 0.47 MB
LED status indications
Convenient LED indicators provide a range of information about device status and function.
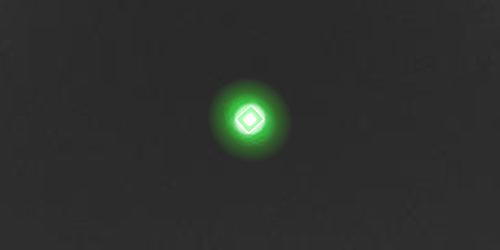
Active streaming

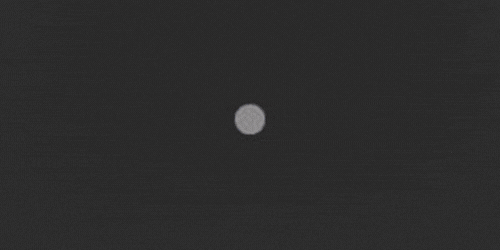
Power on, no streaming
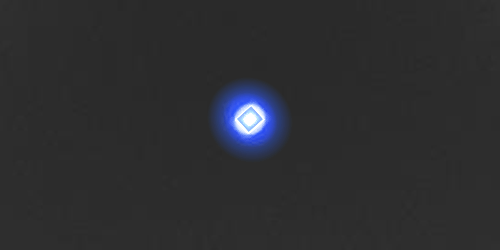
Successful pairing with hearing aids
Searching for hearing aids to pair

Streaming stopped for 30 seconds
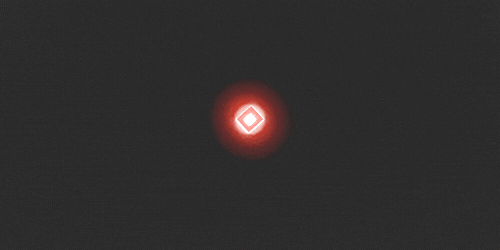
Encountered error

Overheating

Sound format not recognized
TV Sound troubleshooting
This may happen if the TV Sound is connected to the headphone jack, which usually disables the TV’s built-in speakers.
Try these steps:
Use the RCA audio output instead
Unplug from the headphone jack and connect to the TV’s RCA (red/white) audio out ports (they should be labeled “Audio out”). Use the included RCA-to-3.5mm stereo cable.
Use the optical audio output (recommended)
If your TV has a port labeled “Digital audio out (optical)”, use the supplied optical (toslink) cable. Make sure to unplug the analog cable if it’s connected.
Check your TV’s audio settings
Go to the TV’s settings and enable an option to allow the TV speakers and external audio output to work at the same time.
If needed, consult the TV manual or the TV manufacturer's support for help finding the correct port or settings.
Your TV might not be sending audio through the optical output.
Try this:
Open your TV’s sound settings and select “Digital Audio Out” or “Optical” as the output.
This setting is usually under Advanced Settings or Sound > Output Settings, depending on your TV model.
If you can’t find it, check the TV manual or contact the manufacturer's support.
If the LED on the TV Sound is blinking green even with the TV volume turned up, the red/white RCA ports may be inputs, not outputs.
Here’s what to do:
Check that the RCA ports are labeled “Audio out”, not grouped with other colored ports like yellow, green, or blue.
If there are no proper RCA audio out ports, check for an optical output (labelled “Digital audio out (optical)”) and use the supplied toslink cable.
If there’s no optical port either, look for a headphone jack. You can connect a 3.5mm-to-3.5mm stereo cable (not included), but this will mute the TV speakers.
Still unsure? Refer to your TV manual or contact the TV manufacturer’s support for help.
The device is likely overheating.
Take the following steps:
- Keep it out of direct sunlight and avoid placing it near windows or other heat sources.
- Don’t place it in closed spaces like drawers or cabinets — make sure there’s proper airflow.
- Keep it away from other electronics that generate heat, such as TVs or gaming consoles.
- Avoid placing it near heat sources. Keep it away from TV heat vents, gaming consoles, or other electronics that generate heat.
If the TV is playing media and the LED on the TV Sound is solid green, let's start by trying the following:
1. Pair the hearing aids to the TV Sound
- If your hearing aids are connected to another device (like your phone), turn Bluetooth off on that device.
- Turn the hearing aids off and back on, then place them on top of the TV Sound.
- Look for pulsing blue lights on the device — this means it's pairing.
- Once the LED turns solid green, place the hearing aids in your ears. You can now turn Bluetooth back on for your other device.
2. Start the streaming manually
Streaming doesn’t start automatically — choose one of these methods:
- Using the Rexton app: Tap on Stream at the bottom, then tap Play to start streaming. Tap Pause to stop.
- Switch to the TV program in your hearing aids: Use the Rexton app, the buttons on your hearing aids, or a remote control (if available).
- Hearing aid buttons: If your provider set it up, a short or medium press on the buttons may start or stop streaming. Ask your hearing care professional.
3. Adjust the streaming volume
In the Rexton app, go to the Stream section and adjust the TV Streaming volume slider.
You can also use the sliders in the Volume section, but note this also affects the microphones and ambient sound levels.
4. Reset the TV Sound and re-pair the hearing aids
- Press and hold the reset button on the bottom of the TV Sound until the LED turns off.
- Release the button — the LED should start blinking blue.
- Turn off Bluetooth on other paired devices, restart your hearing aids, and place them on top of the TV Sound to pair again.
- When the LED is solid green and the TV is playing, try streaming again.
5. Check the hearing aid battery level
- In the Rexton app, check the battery status.
- If rechargeable, charge for at least 30 minutes before retrying.
- If using disposable batteries, insert fresh ones.
Try these fixes:
- Keep a clear line of sight between the hearing aids and the TV Sound — don’t place it in drawers or behind objects.
- Stay within range: max range is about 10 meters / 30 feet.
- Reduce wireless interference: keep the TV Sound away from other electronics.
- Check cable connections:If using the analog RCA to 3.5mm cable, make sure both ends are plugged in tightly. Try to unplug and replug them to reseat the connection. If using the optical (toslink) cable, ensure the cable is not kinked. Unplug the cable and swap ends to reverse and reseat the connections (ends are identical).
Yes — with the right setup:
- First, unplug your soundbar's optical cable from the TV and soundbar.
- Plug the TV Sound into the TV's optical port using the supplied toslink cable.
- To reconnect the soundbar, you’ll need a minitoslink-to-toslink cable (not included):
- Plug the minitoslink side into the purple analog port on the TV Sound.
- Plug the toslink end into the soundbar’s optical port.
This way, both the TV Sound and the soundbar will receive audio from the TV.
The Smart Mic is compatible with Rexton hearing aids that support Bluetooth connectivity.
It is not compatible with Reach R Plus hearing aids, as they use a different type of Bluetooth.
The Smart Mic works with third-party devices that support Bluetooth 4.2 or newer.
You don’t need an app to use the Smart Mic.
You do not need to have a special hearing program to use the Smart Mic.
However, you can use the Rexton App to control the volume of the audio stream, such as when using it in remote mic mode or streaming audio from a computer.
The Smart Mic can pair with:
- One set of hearing aids
- Up to 8 Bluetooth devices
Only one Bluetooth device can be connected at a time. To switch devices:
- Disconnect the Smart Mic on the first device, then connect it on the second.
- Or, turn off Bluetooth on the first device and then connect on the new one.
Battery performance depends on usage. On a full charge, the Smart Mic can:
- Stream 2 hours of media and 2 hours of phone calls
- Stay on idle for 12 hours (connected, but not actively streaming)
If streaming continuously, it can run for about 6 hours before recharging is needed
It can be used while charging
Charging indicators:
Charging & powered off:
- Blinking orange = charging
- Solid orange = fully charged
Charging & powered on:
- Blinking green = charging
- Slowly pulsing green = fully charged
No, it is not recommended to pair the SmartKey and the Rexton app to the same set of hearing aids.
If both are paired, the Rexton app's connection to the hearing aids may erase the pairing of the SmartKey.
Looking for manuals or safety info?
Visit our Document Library to find user guides and instructions for your hearing aids and accessories.
Document Library